Get started advertising with TonicPow
Create a Campaign
Introduction
Campaigns can have a wide range of options that can be tailored to your exact needs. This guide will; explore the various campaign options, explain how they work, and give you everything you need to get starting building out your first campaign.
Step 1: Create an Advertiser Profile
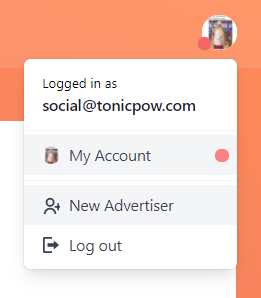
From your account menu in the upper-right corner, click "New Advertiser".
 or just click here: Create Advertiser
Step 2: Create a Campaign
Once your new advertiser profile is selected, the campaigns section of your dashboard will allow you to create new campaigns.
Campaign Image
This image will be used to display the campaign on TonicPow.com. If the target URL has a share image in it's HTML meta information, that will be used for social sharing such as unfurls, otherwise a default TonicPow image will be used.
Target URL
The target url can be set to the URL of any website on the internet with a couple small exceptions. You cannot choose a target url that is a tonicpow short-link, or a short-link from another recognized link service such as bit.ly or sym.re. The reason we do not allow this is because we think it is important that visitors know where a campaign link will bring their audience, reducing the ris of advertisers creating campaigns that lead to malicious websites.
Domain-Wide Campaigns
If you just use your domain name with no specific page as the target URL, any link to that domain will be considered payable. This is a great option for news sites or any platform that has many pages people may want to link to.
Contribute Enabled
This option allows you to control whether people who see your campaign will be see a "contribute" button which lets them add funds to the available pool of rewards.
Requirements
Requirements are the requirements that a promoter must meet to participate in this campaign. For example, an advertiser can require a promoter link their twitter account in order to earn BSV from a particular campaign.
Visitor Restrictions

You can turn on visitor restrictions to limit the countries you are willing to pay for traffic from. This allows you to create localized campaigns.
Currency
You can choose which currency will be use to calculate the number of satoshis (smallest unit of Bitcoin) will be sent to the promoter for clicks and conversions. This is a campaign-wide setting, meaning conversion goals will also use this to denominate all payouts.
Pay per click rate
This is where you decide how much each promoter will earn per click when referring a new visitor to your target URL.
Conversion Goals (optional)
Conversion goals require additional integration via the TonicPow API. If you're using WordPress, we have a plugin to make this part easier. More info can be found in this guide. Once configured, conversion goals can be used to set up complex incentive systems that pay promoters for driving specific actions within your website or application. We'll cover designing your incentive structure in more detail in the next section.
Once your campaign is created, you will see a link called "manage goals" at the top of the page. This allows you to manage conversion goals for this campaign.